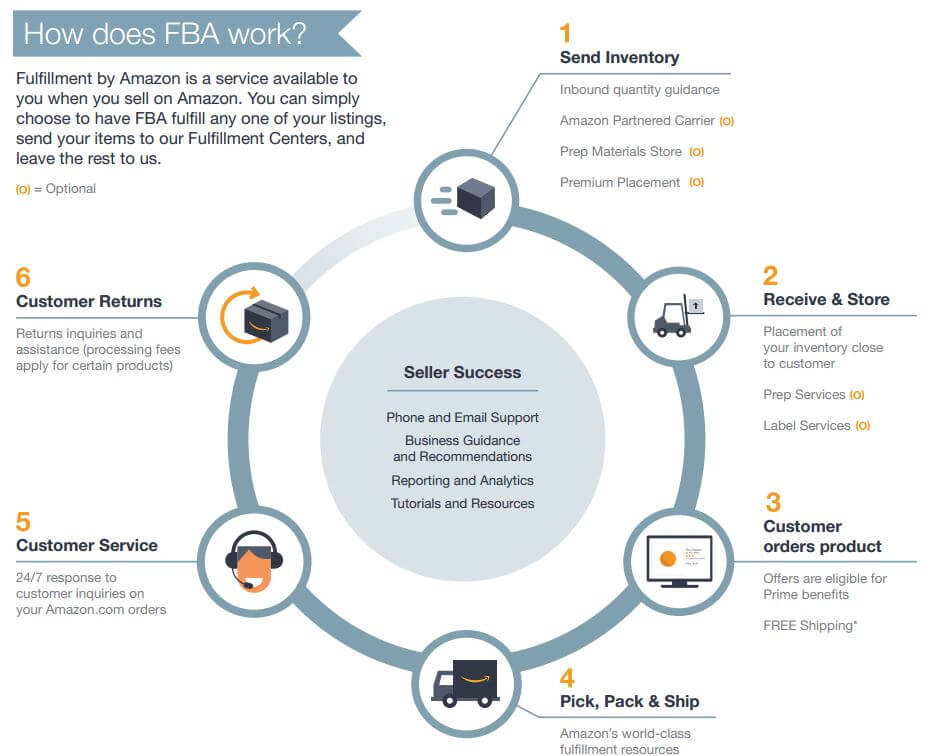
Joining the Fulfillment by Amazon program is a great way to cut down on shipping and packing hassles, eliminate the need for costly storage warehousing and ensure your customers get quick, efficient shipping every time.
BLOG POST: How to Become Successful on Amazon Seller Central with FBA
According to Pat Petriello, Head of Marketplace Strategy at CPC Strategy, “The better the delivery experience, the more satisfied the customer, the more loyal they stay to the Marketplace.”

“While UPS and FedEx have long been integral partners in Amazon’s fulfillment chain, I expect we’ll see Amazon increasingly compete against those carriers by way of rolling out their own fleet of vehicles and owning the last mile of the customer experience.”
How Amazon Sellers Preparing for Shipment
But before Amazon can take over filling your orders and shipping deliveries on your behalf? You first have to get your inventory to them.
This is done by way of “shipping plans,” which you can configure in Amazon Seller Central.
Shipping plans allow you to disperse your product inventory to different Amazon facilities across the country, so they’re closer to customers in each region. (Meaning faster shipments and fewer delays.)

But how do you create these plans? And what options do you have to make it easier?
Let’s break it down now.
How to Configure a Shipment Plan in Amazon Seller Central:
In Amazon, preparing for shipment to distribution centers is no simple process. There are dozens of steps you’ll need to go through, and you’ll have a handful of choices to make, too.

Make sure you keep this step-by-step guide with you as you go through the process – especially the first time.
Step 1: Open up your Manage Inventory page in Seller Central, and select all the products you’re wanting to send to Amazon fulfillment centers. Once you have them selected, click the drop-down menu and select Send / Replenish Inventory.
Step 2: Next, click Create New Shipping Plan, and choose your Ship From This may be the address of a warehouse, your home or some other facility where you purchase or store your inventory. After you’ve added your Ship From address, click Continue to Shipping Plan.
Step 3: You’ll next click on the All Products tab, which shows a full list of the inventory you’ve selected to send to Amazon. In the Units column for each item, type in the total number of products you’ll be sending.
Step 4: Now, it’s time to prepare your products. Under the Who Preps tab, you can select Amazon if you’d like Amazon to do all product preparation on your behalf. Keep in mind there is a per-item fee for this service. If you’re opting to prepare the products yourself, click the Prep Required tab, and see any preparation guidance for the products you’ve selected. Use these tips as you prepare your products for shipment.

Step 5: Next, you’ll need to label your products with UPC, EAN or Amazon barcodes, so they can be tracked through Amazon’s fulfillment process once they arrive on site. Click the Labeling Required tab to see a full list of the products that need barcodes. Under Who Labels, choose either the FBA Label Service (again, this comes with a per-item fee) or opt to label the products yourself by selecting Merchant.
If you choose to do your own labeling, head to the Label Products page and click Print Labels for this Page. Make sure to use a quality printer and fill it with the appropriate sticker/label paper. Once the labels are printed, you can affix them to your products.
Step 6: You’ll next head to the Review Shipments page, which will show the fulfillment center (or centers) you’ve been assigned to. After you’ve reviewed the details of your various shipments, click Approve Shipments to move forward with the process.
Step 7: After you’ve approved your shipments, you’ll be directed to the Prepare Shipment page, which allows you to choose your delivery method. Select from various carriers, choose the number of boxes you’ll be using and schedule and pay for the final delivery. Depending on which shipment method you choose, you’ll then be directed to print your box labels, which you can then place on your shipments to prepare them for pick-up.

As you can see, for sellers using Fulfillment by Amazon, preparing for shipment is a fairly lengthy process. Make sure you keep this guide handy as you go about prepping your FBA shipments, just to make sure you cover all your bases.
Once you approve your shipment, you can only edit a small portion of your delivery, so it’s best to be extra thorough as you go through the first few steps.
To learn more about creating an Amazon shipment plan or other Amazon Seller Central tips, email [email protected].
You Might Be Interested In


