Walmart Seller Center: How to Create & Optimize Listings


When most of us think of the phrase “location, location, location,” our minds immediately envision adventures in house hunting. But tangible buildings aren’t the only type of real estate where location matters; in virtual real estate, location is just as important.
When Walmart launched their Marketplace more than a decade ago, they gave third-party sellers a rare opportunity to own their lot of ‘real estate’ in one of the most desirable locations on the internet—Walmart.com itself. The number of third-party sellers—and the impressive array of inventory they bring with them—has grown exponentially over time, as the desirability of living in Walmart’s virtual neighborhood is as attractive as ever. In fact, the number of Marketplace sellers just surpassed the 100,000 mark in July 2021.
With this influx of new sellers came updates to the Walmart Marketplace Seller Center Dashboard. To help you navigate this upgraded dashboard’s user-friendly interface, we’ve put together a helpful guide exploring each of its primary areas:
Let’s walk through each of these sections to get a better understanding of how to make the most of each, and have your listings active and earning shoppers’ interest in no time!
The Items & Inventory section of Seller Center is where sellers can add new items to their Marketplace catalog, make bulk inventory or pricing updates, check on their feed status, and more. You’ll find this oft-visited category at the top of the left navigation once you’ve logged into Seller Center.
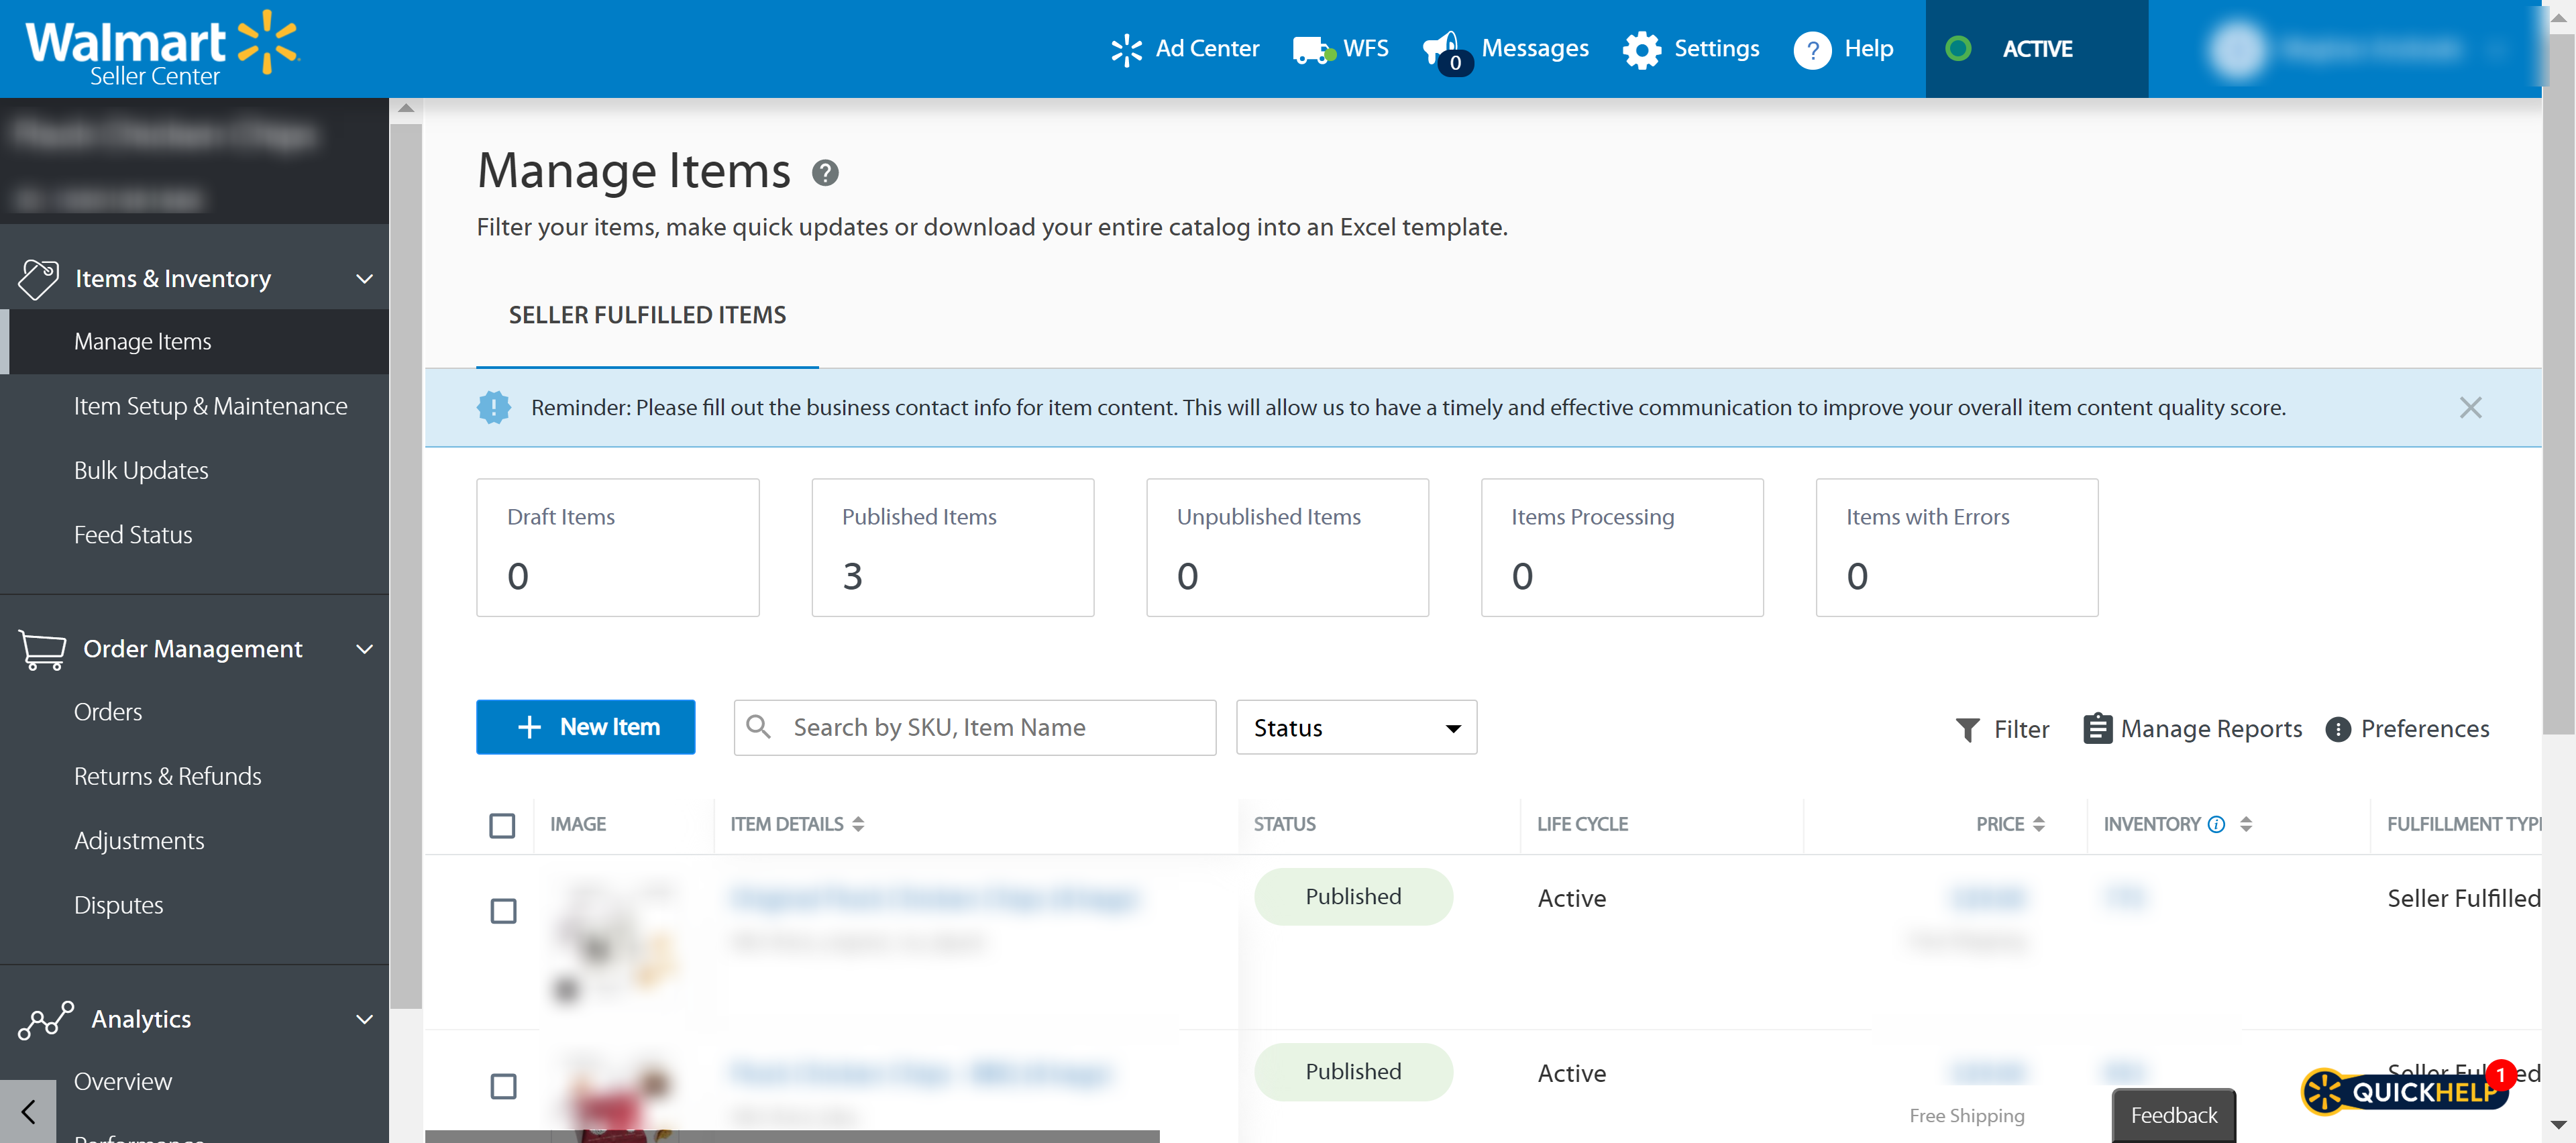
The Manage Items page provides sellers with a comprehensive, at-a-glance overview of critical information about the items in their catalog.
The Insights section at the top of the page presents five boxes with a numeric value inside each. These values reflect how many items in your catalog fall into the below categories…
For each category box that has at least one item listed, you’ll find a clickable link below it to retrieve additional information. If errors are shown, when you click the View Items With Errors link you’ll be provided with more details about what those errors are, as well as how to fix them.
Between Insights and the Item Information Table at the bottom of the page are three rectangular update buttons, which are activated when you select an item in the table below them. These update buttons allow you to make quick and easy changes to…
The Item Information Table beneath the buttons provides a full list of all the items in your catalog, including information about each respective item’s…
Tips
There is a review process once you’ve submitted your items to Walmart. Any items that are under review can be found in this section of Seller Center. If you’ve tried to set something up but it isn’t active, you should see it listed here.
Ready to add more items to your Marketplace catalog? You’re in the right spot! In this section, sellers can add Seller Fulfilled or Walmart Fulfilled items to their inventory. We’ll explore adding Seller Fulfilled Items in one of three ways:
You’ll also see a Maintain Items option, which allows sellers to make bulk edits and maintain the items in their catalog.
Let’s explore the required steps for adding single items, and adding items in bulk…
When you click the button to add a single item to your catalog, an empty Item Create template will populate. Here, you will input the following information:
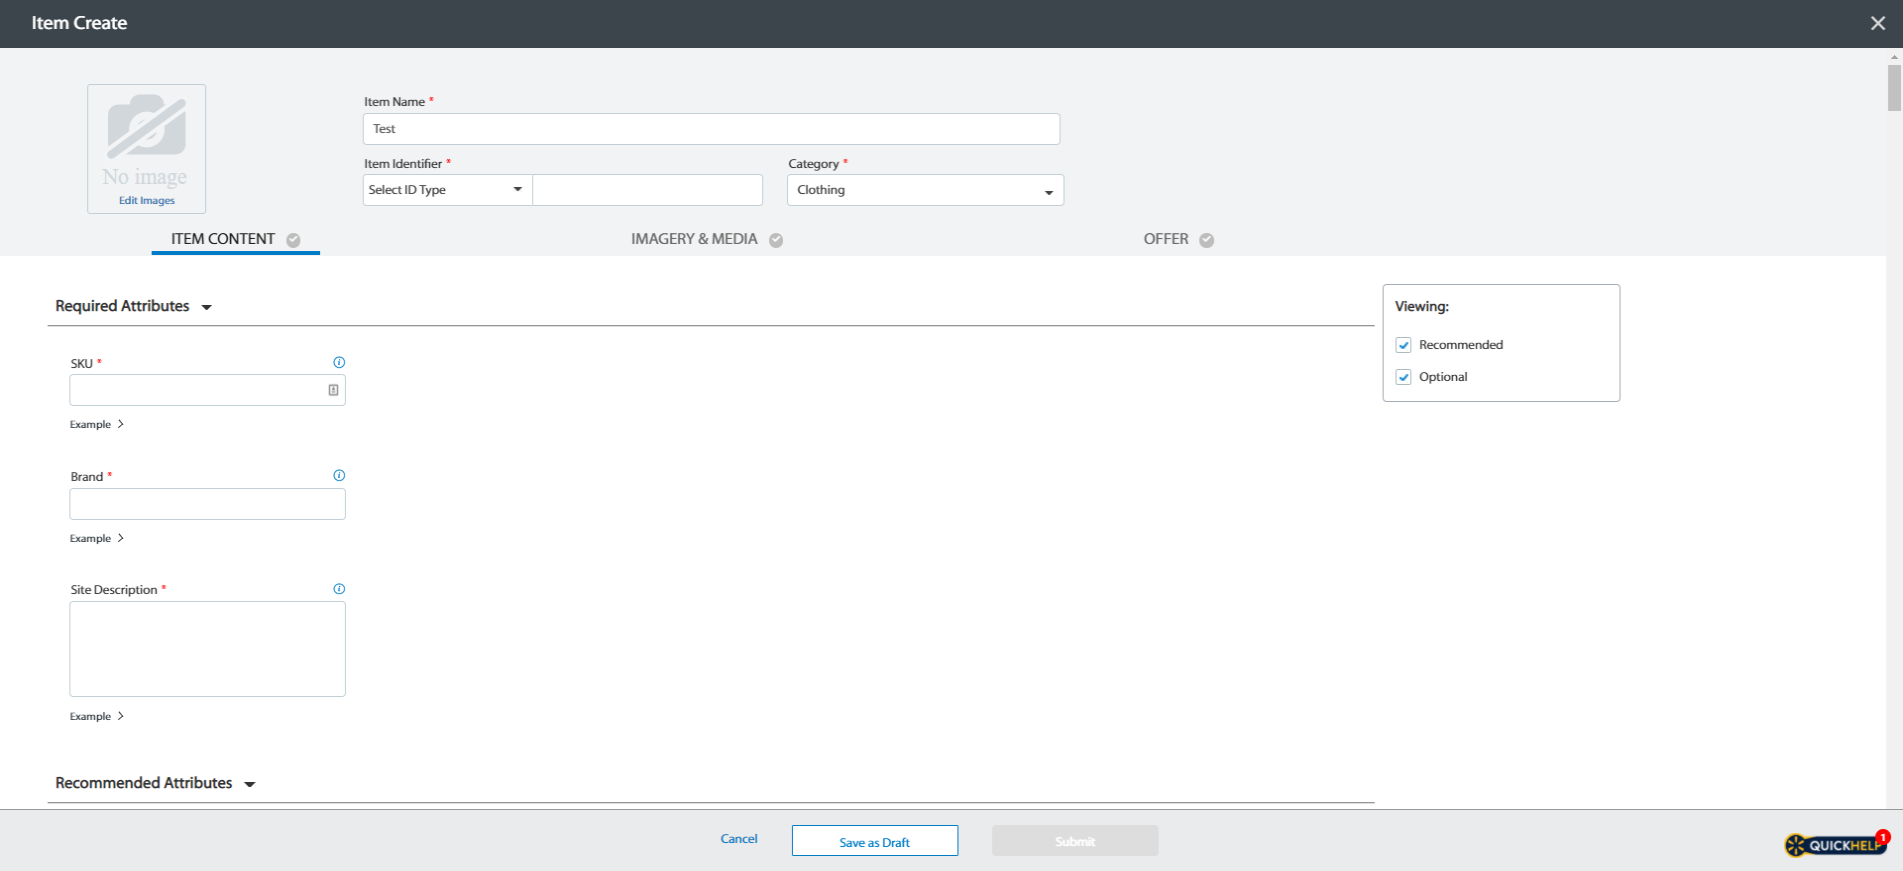
Next, fill out all required attributes, and as many recommended attributes as you’d like. The more information you include, the more discoverable your items will be.
Attribute options include (required are marked with an asterisk):
Ensure that you have added the necessary information to all three sections of the Item Create page—Item Content, Imagery & Media, and Offer.
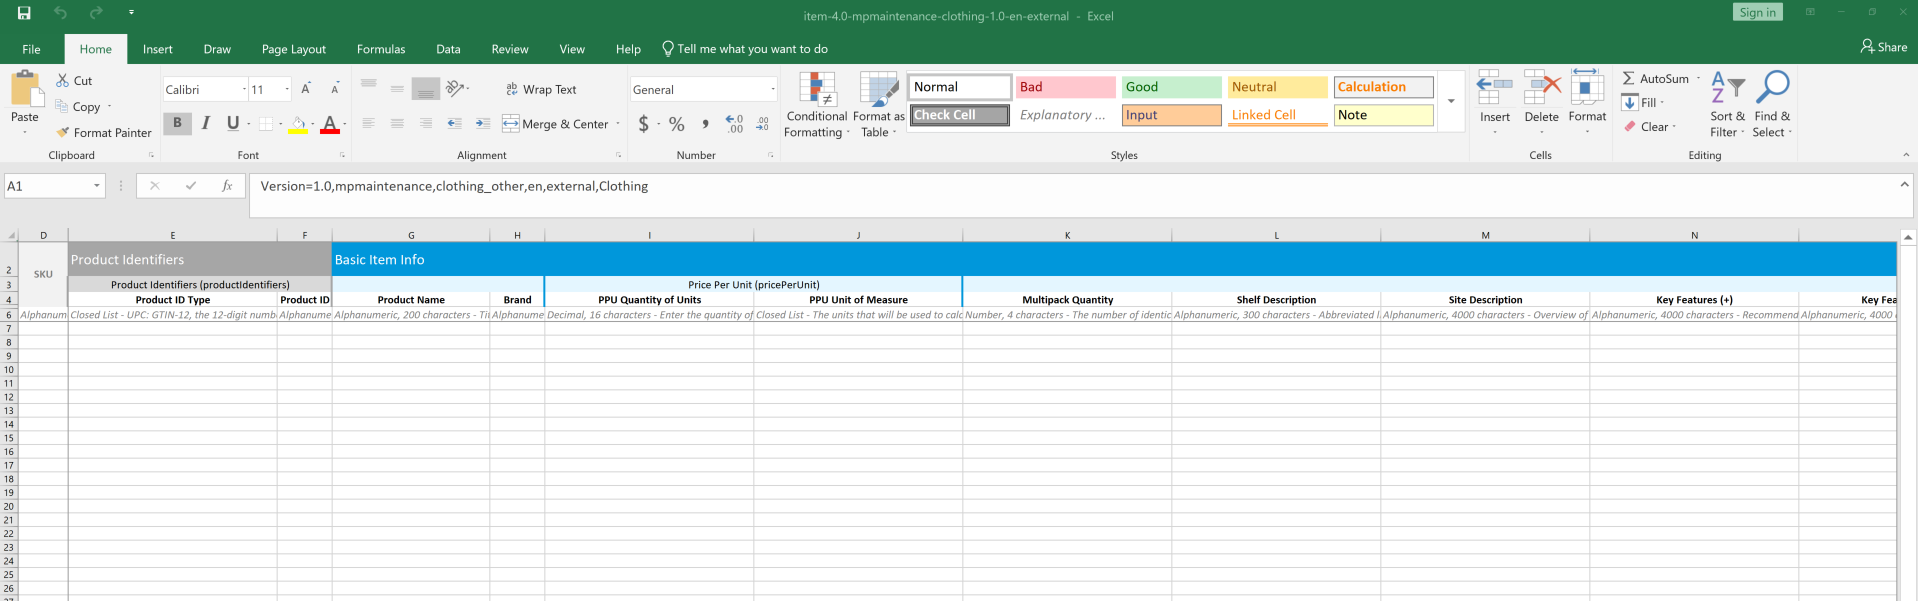
Have dozens, hundreds, or even thousands of items to add to your catalog? Click Add Items in Bulk to download your items and get them properly set up in the spreadsheet.
Beneath Full Item Spec, you’ll notice a dropdown menu alongside a Download button. Choose the appropriate option from the menu to download your Excel item spec.
Some sellers may notice they have an option for Spec version 4.0 and Spec version 3.1. Sellers who haven’t yet migrated to Custom Shipping Templates will see the option for Spec version 3.1. While you can continue with that version, Walmart recommends that you migrate to custom shipping templates and the 4.0 Spec sheet, which you can then use on the existing items in your catalog.
Bulk Item Setup Spreadsheet
If you aren’t accustomed to working within robust Excel spreadsheets, the item setup spreadsheet may seem overwhelming at first glance. But fear not—Walmart has designed the spreadsheet to be quite intuitive and user-friendly, helping sellers to ensure they’ve provided all required attributes for their products, and easily identify any gaps.
Attribute Groups
At the top of the bulk item setup spreadsheet, Walmart has broken out attribute groups into color-coded categories:
The first grouping is for Required attributes. Every row that falls under this first colored category must be filled in for your items to be eligible for sale on Walmart.com. These attributes might include:
The next grouping is for attributes that are required for your item to be visible on Walmart.com. These attributes might include a Site Description and Main Image URL.
As you scroll further to the right, you will find additional groupings, with each clearly identified as Required, Recommended, or Optional. While it can take a bit more time up front to make your listings as attribute-packed as possible, you will see greater visibility while providing a better user experience if you invest the time now to help shoppers discover and better understand your items.
In Row 6 of the bulk item setup spreadsheet, Walmart has provided definitions, data types, data lengths, and sample values to help sellers better understand the information they’ll be entering, starting with their first item on Row 7.
Please note that there may be hidden items in the spreadsheet when you download it, and it is imperative that you don’t edit any of these items for it to function properly.
Walmart recommends using closed lists where applicable, looking for a plus sign (+) to multi-select attributes. If you need to add any additional rows for a multi-select attribute, you can easily insert an additional column or columns, copying and pasting rows 3-7 in your spreadsheet. For example, let’s assume you wanted to include five key features for an item you’ll be adding to your catalog. Your spreadsheet should include a column header for Key Features (+). Because you’ll only want to add one key feature in the respective item’s cell for that column, you’ll want to add four additional columns for Key Features. Be sure to add the features in the order in which you’d like them to display on-site.
Once you’ve added everything to your spec sheet and submitted it, you can track the status of your items in Feed Status.
Maintain Items
One of the most recent Seller Center updates is the Maintain Items section. This was designed to allow for quick edits to one attribute at a time without necessitating a full spreadsheet upload.
Seller Center offers several bulk update pages for the following common update types:
On each respective page, sellers can easily make updates in large batches instead of manual, “one at a time” modifications. Within each page you will see a Download Spec button; be mindful that you are downloading the appropriate spec file when making updates. Also keep in mind that whenever you update a spec, you can track the status of your update on the Feed Status page.
Whenever you add new items, promotions, inventory, prices, or lag times, your Feed Status page will provide you with information on the status of those uploads. Let’s explore what each of those potential statuses means:
Perhaps more than any other retailer in the world, Walmart has built their reputation on the promise of low prices. To accomplish this, Walmart may sometimes—at their discretion—lower the prices on eligible Marketplace sellers’ items to stay competitive.
If Walmart does lower the price on one or more of your eligible items, you as the seller will still receive full payment based on the price you set if/when one of your items is purchased. In this scenario, Walmart essentially ‘eats the difference’ as they were the ones who decided to adjust the price.
Ideally, the Order Management section of Seller Center is somewhere you’ll be spending a good bit of time. Let’s explore each of the pages within…
The Orders page is where sellers navigate to acknowledge, ship, or cancel orders that have been placed. Quick Filters at the top left of the page allow you to sort between Seller Fulfilled Orders and Partner Fulfilled Orders (Delivery). For this walkthrough, we have selected Seller Fulfilled Orders.
Immediately below the Quick Filters, you’ll see a collapsible Insights section, which organizes orders by the stage they’re in. Boxes will display how many of your orders fall into each of the below stages, with a clickable View Orders link beneath each:
Beneath the Insights section, your late, due today, and new orders will be represented within the table. You can click on the PO number for any order in the table to acknowledge, ship, or cancel the order.
Tip: Walmart recommends that sellers acknowledge all new orders within four hours on regular business days. This will help ensure that your inventory balance is accurate, your account is kept in good standing, and customers are updated within an expected timeframe.
How to Acknowledge & Ship an Order
Seller Center offers three distinct ways of acknowledging and shipping customer orders:
Using the Seller Center UI
Once you’ve acknowledged the order, your next step will be to ship or cancel the order. In the same Status dropdown where you previously selected Acknowledge, choose Ship or the Cancel option with the appropriate reasoning.
Once you’ve selected Ship, be sure to select or enter the remaining required information, including the quantity, carrier, and tracking number, and optionally, the Seller Order Number. You’ll notice that the Tracking URL field is blank; this will automatically update once you’ve clicked the Update button at the bottom of the page. Upon clicking the Update button, Walmart will notify the customer that their order has shipped, and move this order into your Past Orders page.
Using an Excel Spreadsheet
How to Acknowledge & Cancel an Order
There may be times you need to cancel a customer’s order for several potential reasons. These might include an item being out of stock, a pricing error, or that the customer has simply decided they no longer want or need the item they’ve ordered, and have sent a notification of such before the item has shipped.
It is important to remember that all orders need to be acknowledged before they can be canceled, so that is step one in the cancellation process. Let’s walk through what comes next…
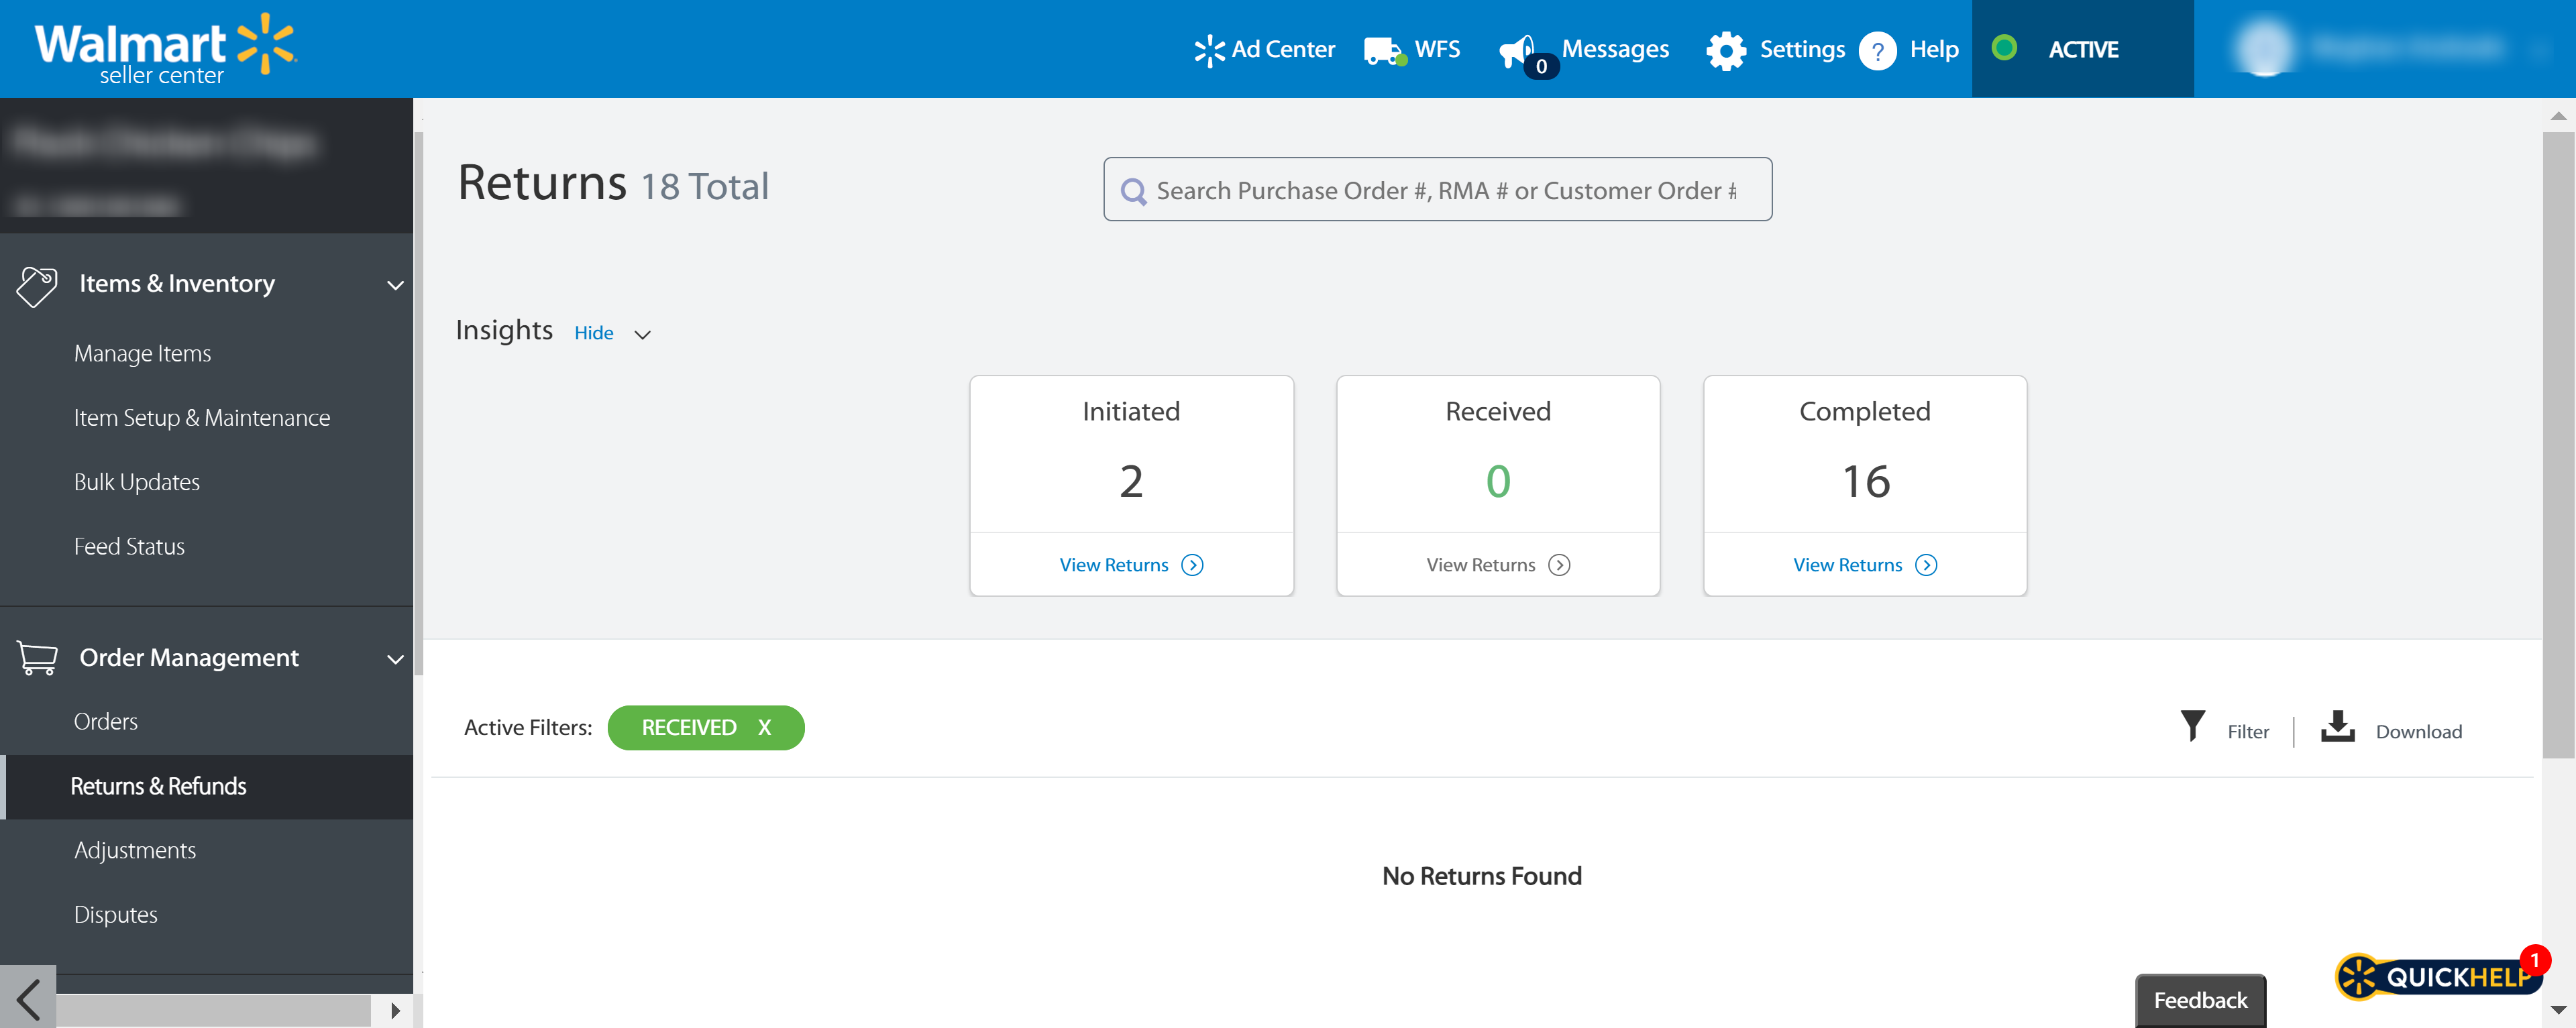
Let’s dive into what each return stage indicates…
Sellers will have the option to refund the customer once an item is in the Initiated or Received stage. It is important to remember that after your return has been received, if you have not yet taken action, Walmart will refund the customer automatically after 48 hours.
How to Refund an Order
Order adjustments aren’t very common, but allow sellers to provide customers with full or partial refunds for several reasons. Typical reasons for adjustments include an order being delivered late, an order not being received at all, or an order arriving damaged or defective.

If you need to dispute a return, two things must happen before you can proceed. Firstly, a return can only be disputed once it has reached the completed stage. Secondly, it is required that at least 48 hours have passed since you’ve issued the refund.
Please note that there is a time limit for disputes—Returns are eligible to be disputed for up to 45 days.
Navigating to the Disputes page in the left navigation, you will find 4 boxes at the top of the page. These will showcase how many of your disputes are within each of the following stages:
Walmart offers sellers an impressive array of data to help understand what’s working well, and where there is room for improvement and growth. Let’s take a closer look.
The Overview page offers a valuable, at-a-glance view of your Marketplace performance, and is among the pages sellers will be likely to visit most often. The overview provides insights into:
Your Performance page is data-packed, with ample charts and other visuals to help sellers get a clear picture of how they’re trending…
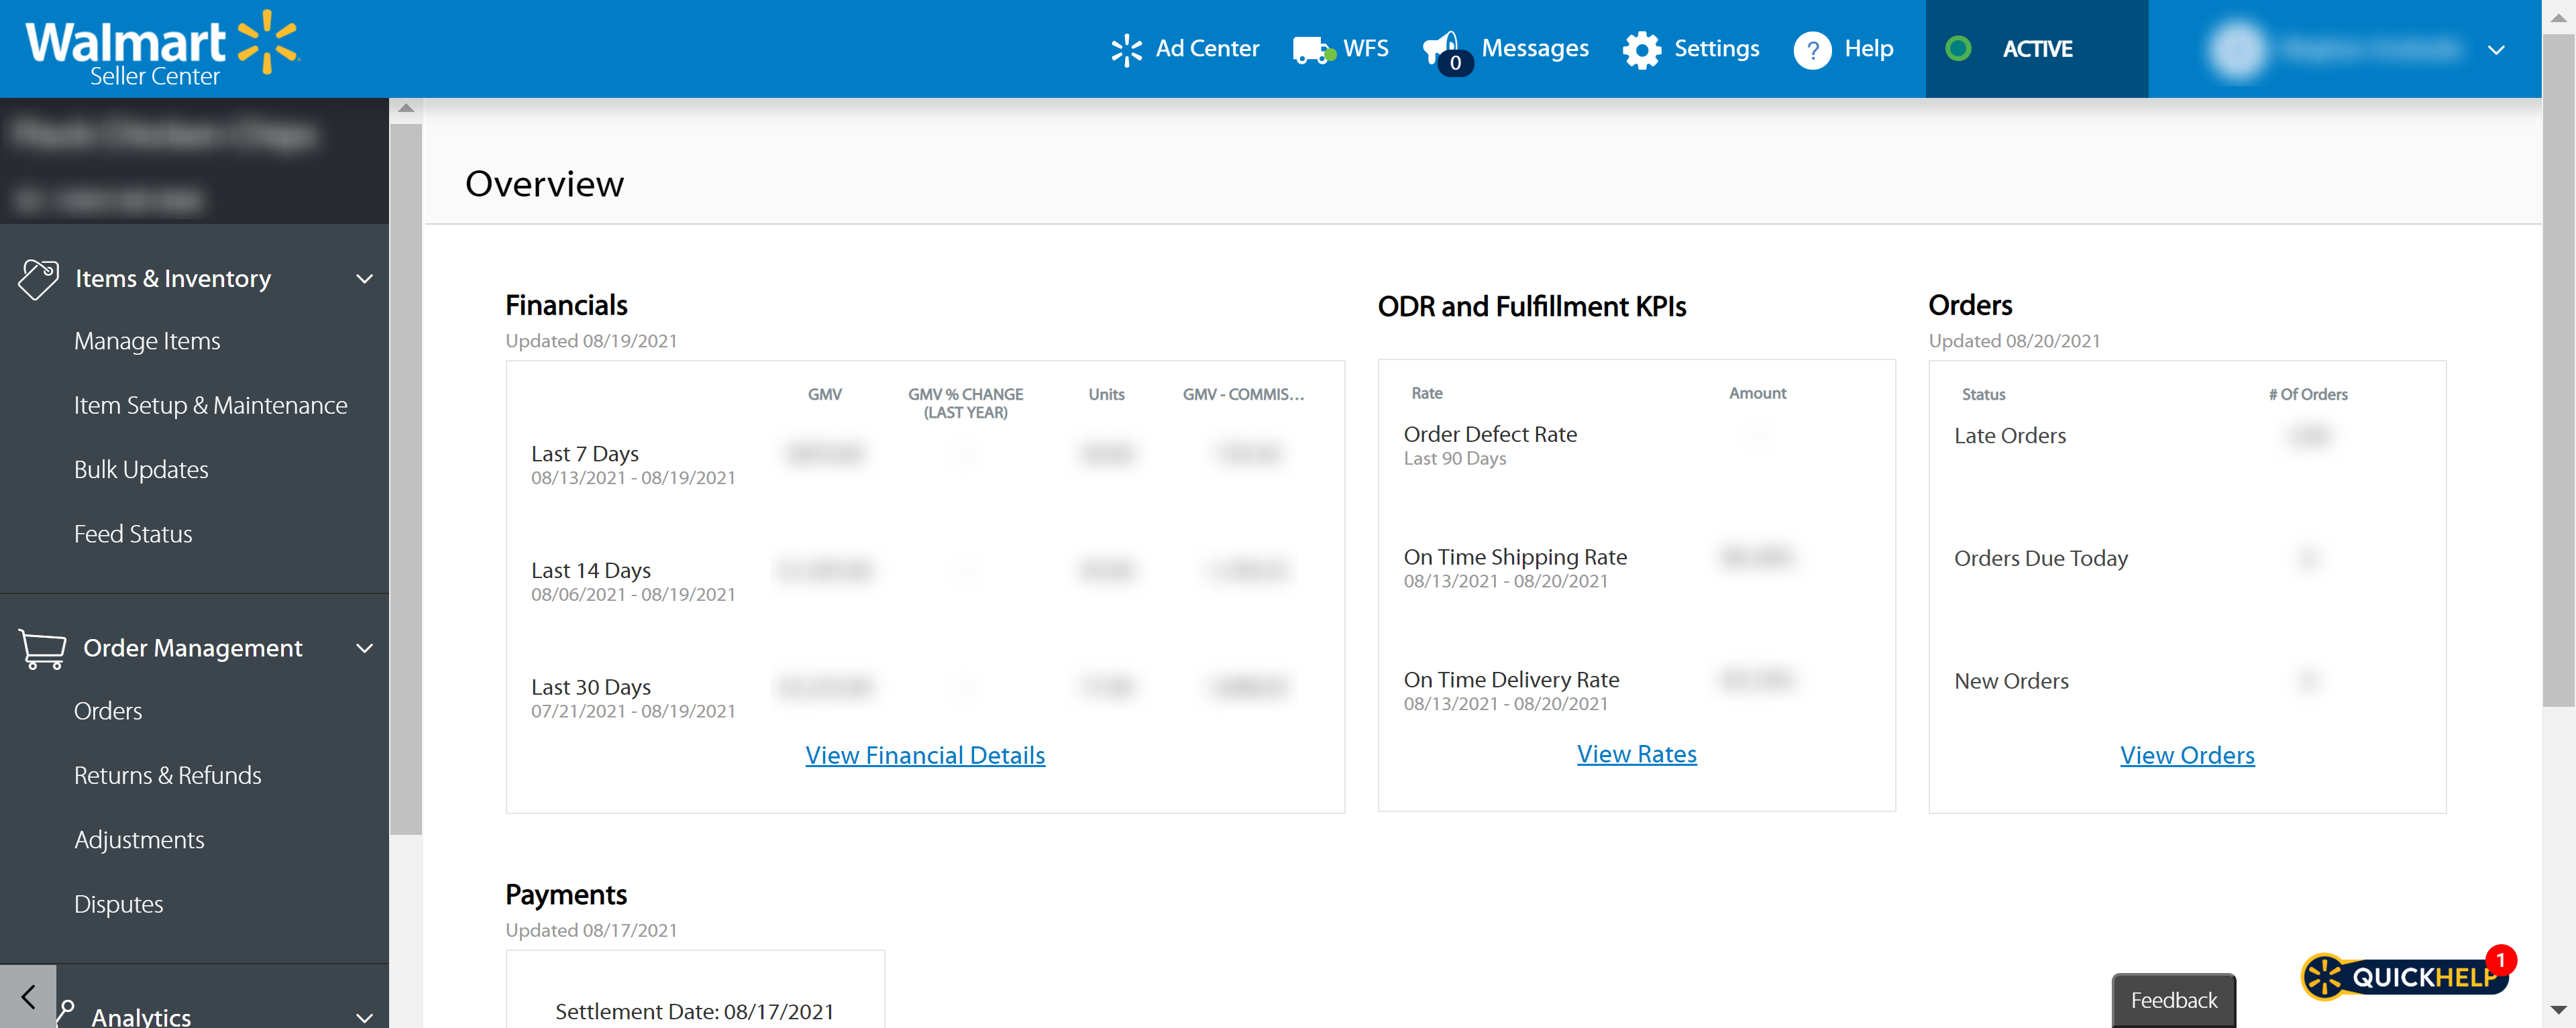
Financials
In the dropdowns at the upper right, you can customize your charts below based on the shipping programs you’ve enrolled in, department, category, specific brands, or time range. Beneath the chart to the right, you’ll find two clickable links—View Daily Performance Report and View Item Level Performance Report. Clicking each will download the respective report. Want to see financial information about specific items? Moving further down the page, you’ll find a dropdown search box that allows you to Search By Item ID or Search By Title. This page can also be easily exported as an Excel file by clicking the Export button at the far right.
This shows data related to your Order Defect Rate (ODR), to include:
For more information about any of the above, click to Download the individual reports to the right of each. Also, be sure to review the 90-day ODR Trend Chart shown immediately below for a quick visual of how you’re trending over time.
Fulfillment
Here, you’ll see three clickable buttons to hone in on Shipping Performance, Carrier Performance, and Regional Performance:
Trust and Safety
If you find that you don’t have any trust and safety violations, that’s great! Not all sellers will find violations that need remedying. For those that do, this section will break down any violations you’ve had within three different types, showing the total for each separately. These include Regulatory Compliance, Offensive Product, and Intellectual Property. Downloadable reports with further details will be available in this section if you have any violations.
Ratings & Reviews
This shows your average customer rating on a five-star scale, and also includes individual comments left with their corresponding star ratings. Your ratings are also listed within your Seller Scorecard.
One of the most exciting areas of Seller Center is Growth Opportunities. Here, Walmart provides sellers with the necessary tools and actionable insights to make informed choices aimed at growing their catalog and improving their sales on Marketplace.
Once you’ve navigated to the Growth Opportunities page in the left nav, you’ll find it is broken out into five tabs, highlighted below…
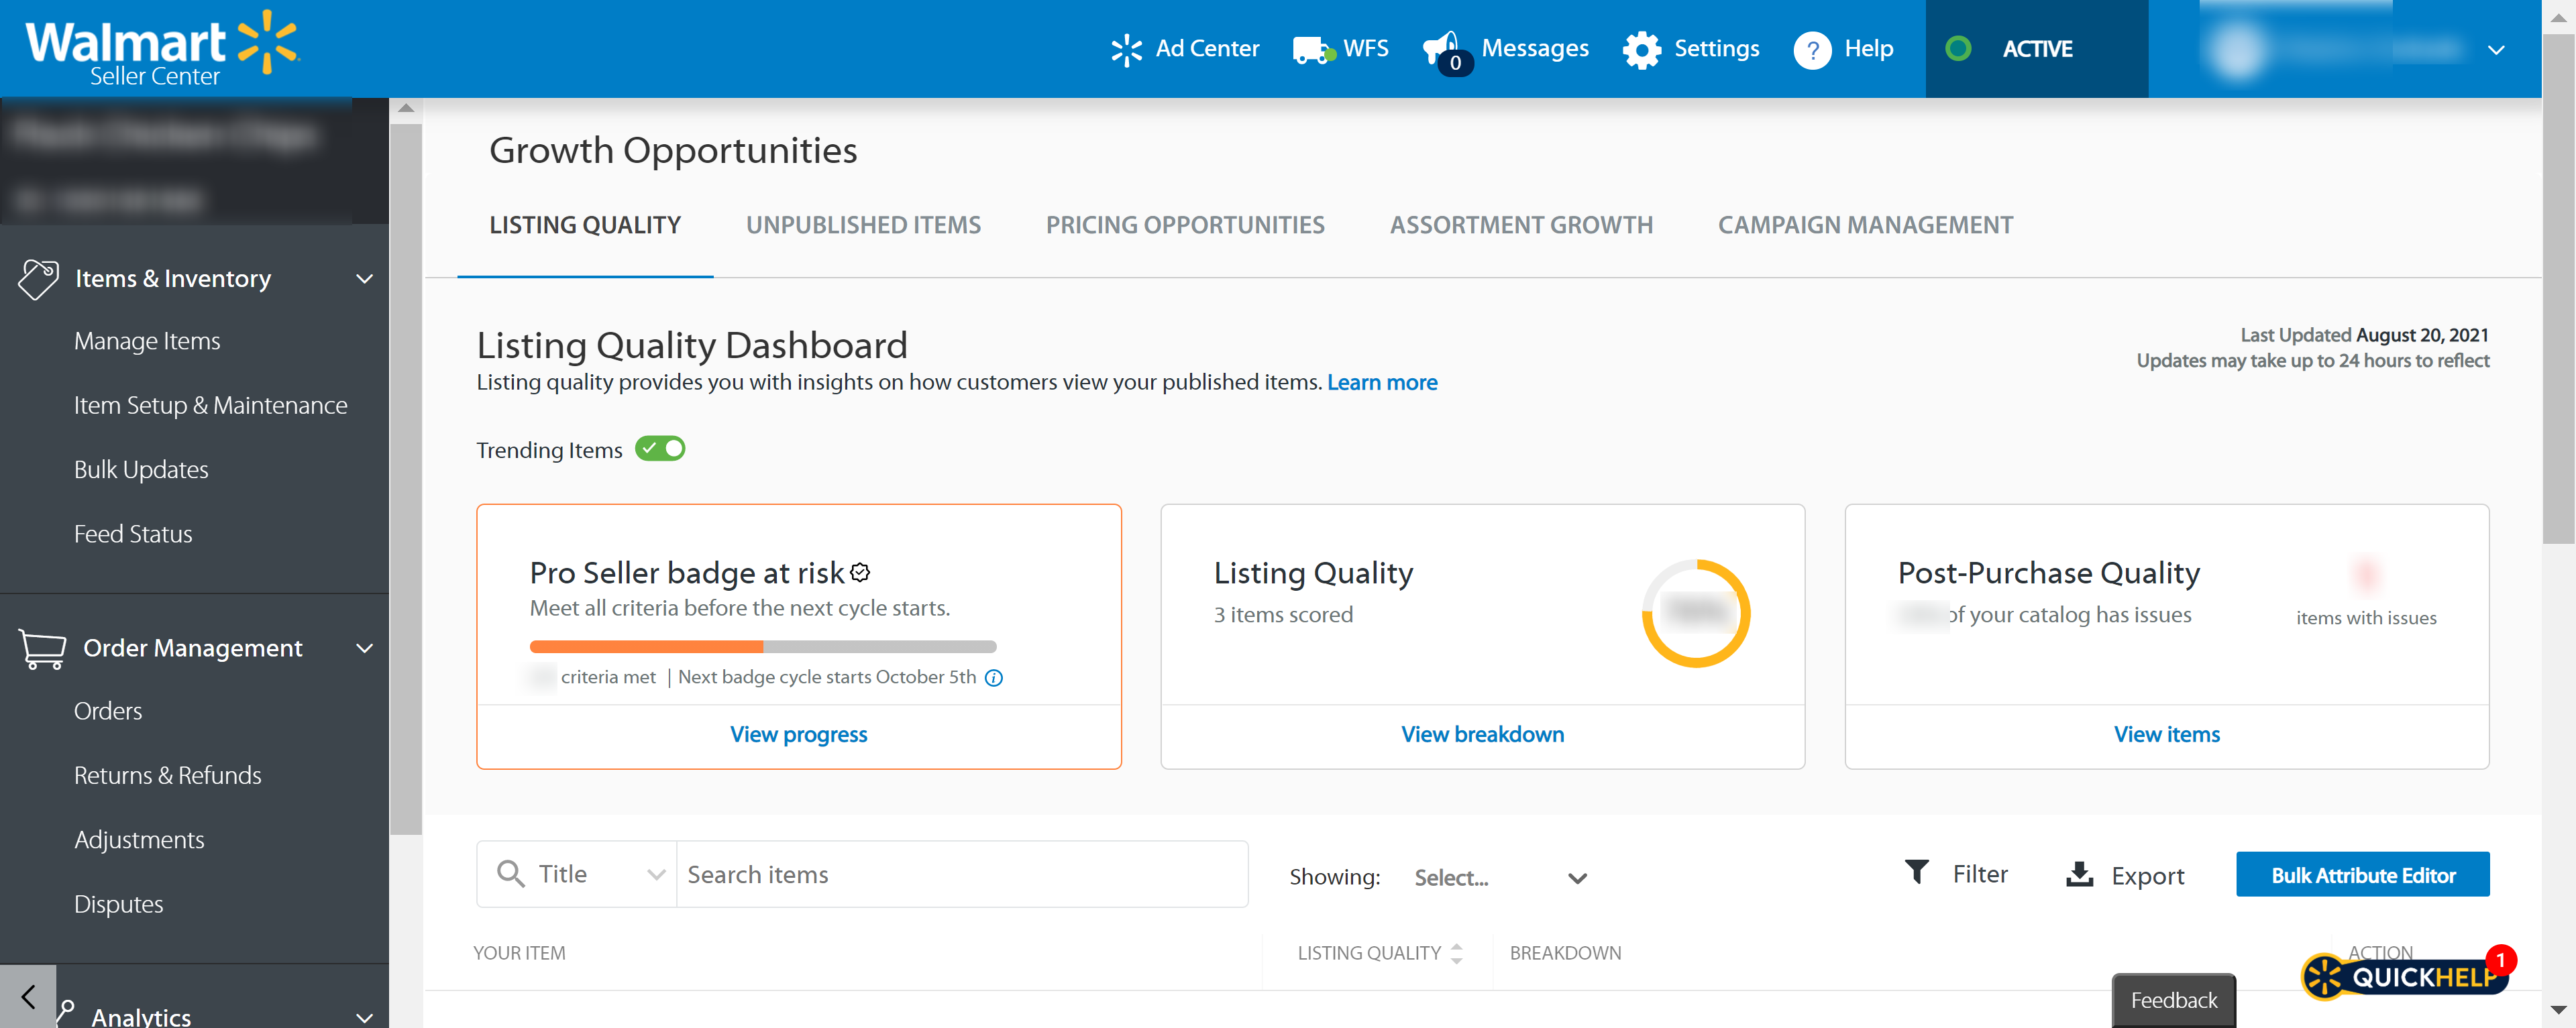
One of the newest additions to Seller Center is the Listing Quality Dashboard, designed to give sellers a better understanding of how shoppers view the items in their catalog and make improvements where possible.
Filters at the top of the page allow you to narrow your focus to Trending Items or Walmart Fulfilled Items (for enrolled sellers). Turning on the filter for Trending Items — items in your published catalog with heightened demand — we are shown three boxes highlighting…
Listing Quality
Here you’ll see a percentage highlighting the overall quality score of the items in your catalog. A clickable View breakdown link will provide a more detailed list about that score.
Post-Purchase Quality
This shows sellers the number of sold items with post-purchase issues, as well as a percentage determined by what percentage of their total catalog that number represents. To take a closer look at what those items were, click View items.
Pro Seller Badge
This box shows sellers if they are currently meeting Pro Seller badging criteria. If your box is showing that you are Not Eligible, click Learn more for detailed information about your standings, explaining what you’ll have to do to earn eligibility.
Below, you will find a search box with a dropdown option to search by Title, SKU, or Item ID on the left side of the screen. You’ll also have the option to filter by score ranges by clicking the filter button on the right side of the screen.
Click Details on one of the items in the list to go to that listing’s Item Details page, which is packed with information, including the Item Sales Rank, GMV, Page Views, Units Sold, Conversion Rate, and more.
Three tabs at the bottom of this page hone in on improvement opportunities related to your Content & Discoverability, Offer, and Post-Purchase issues. Please note that in some instances, you will see a lock icon beneath Action. The lock indicates that a given attribute cannot be edited because of its content ranking.
Unpublished Items
For a quick view of how impactful your unpublished items in total are to your sales potential, Walmart includes three boxes highlighting each of the below toward the top of the page…
Below the boxes, the specific reasons are highlighted under Issue, with an explanation for each, how many of your items are affected by that issue, and the unpublished value of all items affected by a particular issue.
At the far right of each issue type, you will see a clickable View Items button. Clicking into here we find more detailed information, and the opportunity to resolve the issues.
In the Item Details table at the bottom, you’ll notice a column for Actions. Here, updates can be made on an individual item level right within the table. Have several issues and prefer to update in bulk? Click the Bulk Actions button directly above the table to download the proper Excel template.
Tip: If you have resolved a listed issue and your item still hasn’t republished, verify that was the only issue with that item. Some items may have unpublished for more than one reason, and will not republish until all issues have been resolved.
Pricing Opportunities
This section highlights growth opportunities specifically related to pricing, giving you the necessary tools and information to be more competitive.
At the top right of the page, you will see your Buy Box Win Rate – the percentage of your catalog that is currently winning the buy box—with a clickable link to dive into those Winning Items. Similar to unpublished opportunities, pricing adjustments can be made individually within the table in that item’s New Price box, or via a bulk update.
Prices can also be adjusted in bulk using the box directly beneath Pricing Opportunities. This allows you to set a dollar amount by which you want to beat the current buy box winning item’s price across all items in the table. Enter your dollar amount, and click Fill Table.
Assortment Growth
Click the View button to visit the Walmart Best Sellers tool, which will help you uncover the items that are currently earning ample sales on Walmart.com. This tool is designed to give sellers inspiration about high-performing items they might want to consider adding to their catalog, allowing them to hone in on specific departments and sub-departments to find those that best match the type of items they offer.
Marketplace Campaign Management
Seller Center’s Campaign Management dashboard enables sellers to easily take part in seasonal and category-specific campaigns that are managed by Walmart, which can have a positive impact on revenue, and overall visibility in the marketplace. Campaign Management is a free tool, and not to be confused with the CPC (cost-per-click) ad platform, Walmart Sponsored Products.
Sellers who elect to participate can submit relevant items from their catalog for consideration when Walmart is running a campaign for which they meet the criteria. Walmart will share the Campaign Guidelines for upcoming campaigns, including the dates the campaign will run, and which categories will be impacted.
We recommend regularly reviewing Walmart’s upcoming campaigns to see which apply to your product lineup. When you have a relevant item or items, you can submit them individually, or through a bulk upload.
In this section, sellers are able to configure their fulfillment centers (seller-fulfilled and/or WFS), shipping information, and shipping templates (default or custom).
“Shipping templates let you manage your shipping settings across several products at once (e.g. service levels, shipping regions, transit times, and shipping rates). Each seller account can create up to 15 shipping templates and map specific groups of SKUs to each.”
This section is broken out into two tabs…
Similar to Amazon’s FBA (Fulfillment by Amazon), the Walmart Fulfillment Services program gives sellers the option to have the retailer themselves pack and ship their orders, handle any returns, and provide customer service related to those purchases.
Participating sellers can send their inventory directly to a Walmart fulfillment center(s), and when an order is placed, Walmart will handle the shipping and customer notifications. As noted by Walmart:
“The program enables sellers to spend more time focusing on increasing their sales, while having confidence that their orders will be delivered quickly and with outstanding customer support.”
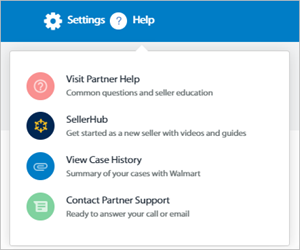
Within the help section found on the top navigation bar you will find the below areas you can visit:
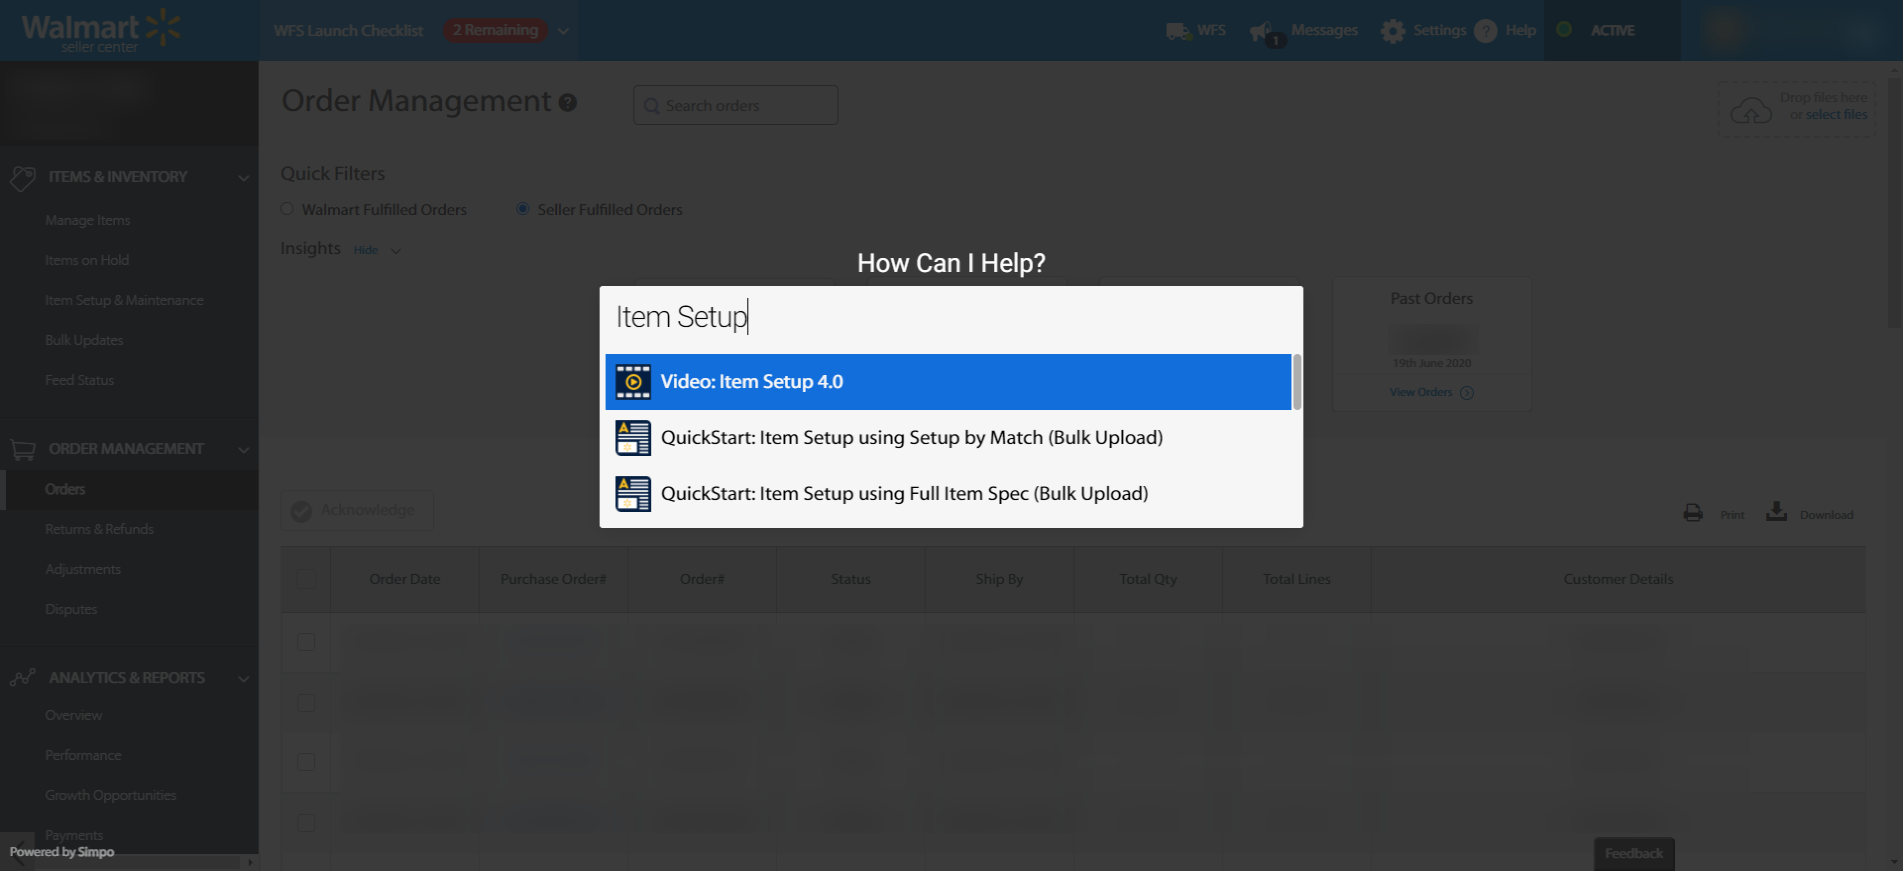
Walmart has packed tons of helpful information right within Seller Center, making it easily accessible via their QuickHelp feature. As you navigate from page to page, you’ll see a small QuickHelp icon in the bottom right-hand corner of all Seller Center screens.
When you click this button, a How Can I Help? search box will appear. Enter keywords related to the action you are trying to take or questions you have, in the search box, being as broad or specific as necessary to generate relevant results. Questions about adding new items to your catalog? Search ‘items’, and as you type, suggested resources will begin to pop up. These resources might include…
To exit QuickHelp, move your mouse anywhere outside the pop-up window and click the screen.
Seller Center email notifications help ensure you can stay on top of new orders in your account, even when you’re not actively monitoring your dashboard. To set-up notifications, log in to Seller Center and navigate to the Settings tab at the top of your screen. Click Notification Settings beneath Administrator Options.
Notifications will alert you when a new order has been placed that requires your acknowledgment and can be turned on by toggling the box next to Email: Open Orders. Immediately below, you can also confirm that your correct email address is tied to your notifications, and select the frequency with which you’d like to receive notifications. Need to edit the email? Click Manage Contacts under Partner Profile in General Settings to add or update. While you can have more than one email address in your contacts, only one email can be selected to receive notifications. Be sure to click Save to confirm your settings.
Reach out today to learn more about how our team can magnify your Marketplace presence with our proprietary Walmart Advertising technology— the industry’s most comprehensive Walmart marketing program.
Editor’s Note: This post was originally published by Shannon Mullery in December 2020 and has been updated for freshness, accuracy, and comprehensiveness.